Rough framing a house is one of the most critical stages of the construction process. It provides the skeleton that supports the entire structure, and it involves the building of the framework that will later be enclosed with walls, windows, doors, and roofs. The rough frame is usually completed before interior work begins, and it serves as the foundation for every subsequent step. To ensure a structurally sound, safe, and code-compliant building, the process must be done with care and attention to detail. The following are the essential steps to rough-frame a house, providing a comprehensive look at the key stages involved.
1. Planning and Preparation
Before any physical work begins, it’s crucial to thoroughly plan the project. This phase involves understanding the house’s blueprint or architectural plans, which detail everything from the dimensions and shape of the structure to the locations of windows, doors, and other significant features. Builders must understand local building codes, zoning requirements, and any other regulations that impact the framing process. This stage also involves ensuring that all necessary materials, tools, and equipment are ready. Materials typically include lumber (for studs, joists, and rafters), nails, screws, connectors, and hardware, along with safety equipment and specialized tools like saws, drills, and framing hammers. Having all materials and tools on-site and organized reduces downtime during the framing process.
2. Setting the Foundation
The foundation of the house must be completed and inspected before the rough framing begins. Depending on the type of foundation used—whether it’s a slab, crawl space, or full basement—additional preparation steps will be required. Once the foundation is ready, builders place the sill plate, a horizontal piece of treated wood that sits on top of the foundation walls and provides a base for the framing of the house. The sill plate is bolted into place using anchor bolts that go through the plate and into the foundation, ensuring that the structure is securely anchored to the ground. It’s critical that the sill plate is level and square, as any misalignment at this stage can lead to problems with the framing process.
3. Building the Floor Frame
The floor frame is constructed next, and its role is to provide a flat, stable surface for the rest of the house to be built upon. This part of the framing involves laying down the floor joists, which are long, horizontal beams that provide support for the floor. The joists are spaced according to code requirements, typically 16 or 24 inches apart, depending on the load-bearing requirements and the type of flooring material used. Once the joists are laid out, they are connected with a ledger board or rim joists that run along the perimeter of the structure. The floor joists must be level and square to ensure proper weight distribution and prevent uneven floors later. A subfloor, typically made from plywood or oriented strand board (OSB), is then fastened to the joists to create a solid platform for the walls and rooms to be framed.
4. Framing the Exterior Walls
The next step is the framing of the exterior walls, which are the structural boundaries of the house. Wall framing begins by cutting and assembling the vertical studs, which are typically spaced 16 or 24 inches apart. The studs are attached to top and bottom plates, horizontal pieces of wood that run along the top and bottom of the wall. The plates are carefully measured and aligned to ensure that the wall is level and square. In some cases, temporary braces may be used to hold the walls in place while they are being attached to the floor frame and each other. Openings for doors and windows are framed with additional pieces called headers, which are designed to bear the weight of the structure above the openings. Once all the exterior walls are framed, they are raised into position, secured to the floor frame, and temporarily braced until they are permanently attached.
5. Framing the Interior Walls
Once the exterior walls are in place, the framing of the interior walls begins. These walls divide the living space into rooms and must be carefully planned according to the architectural design. Interior walls are typically framed using the same technique as exterior walls, but they do not need to be as heavy-duty. The studs are cut to the height of the ceiling and placed in the appropriate locations based on the floor plan. Just like with the exterior walls, the interior walls are assembled with top and bottom plates, and studs are spaced 16 inches apart for support. Openings for doors and windows inside the house are framed using headers, similar to the exterior framing process. The interior walls are then raised into position, attached to the floor frame, and secured to the exterior walls as necessary.
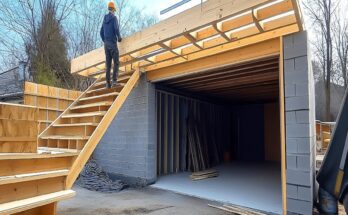
6. Framing the Roof
Framing the roof is a complex and crucial step in the construction process. The roof is designed to protect the structure from the elements and needs to be properly framed to bear the weight of the roof materials and withstand environmental forces. Depending on the style of roof—whether it’s gable, hip, or flat—the roof framing involves different techniques. Typically, roof trusses, pre-fabricated triangular frameworks that are designed to distribute the weight of the roof, are used in modern construction. These trusses are carefully placed and attached to the top plates of the walls. Alternatively, rafters can be individually cut and installed, though this method is labor-intensive and less commonly used today. The roof framing also involves the installation of ridge beams, which support the peak of the roof, and collar ties or purlins to prevent the rafters from spreading apart. The roof framing must be done with great precision to ensure that the roof is strong, durable, and properly aligned.
7. Sheathing the Walls and Roof
Once the framework of the house is complete, the next step is to add sheathing to the exterior walls and roof. Sheathing consists of large sheets of plywood or OSB that are nailed or screwed to the studs and rafters to provide structural integrity and a surface for attaching the exterior finishes, such as siding or roofing. The sheathing must be installed in a way that ensures the proper overlap at seams, as this helps to distribute loads evenly across the structure. The wall sheathing should be fastened securely to the studs, and the roof sheathing should be installed with care to prevent movement during the final stages of construction. The sheathing provides the house with an initial layer of protection from the elements, though further sealing and weatherproofing steps will be added later.
8. Plumbing, Electrical, and HVAC Rough-In
Once the structure is framed, the rough-in for plumbing, electrical, and HVAC systems begins. These systems are integrated into the framing and are essential for the functionality of the house. The plumbing rough-in involves running pipes through the walls and floors, with specific care given to venting and drainage systems. The electrical rough-in includes running electrical wiring and installing electrical boxes for outlets, switches, and light fixtures. The HVAC rough-in includes installing ductwork and other necessary systems to ensure proper airflow and heating or cooling of the home. All of these systems must be carefully planned to avoid conflicts with the structural framework and must be inspected by local authorities to ensure compliance with building codes.
9. Inspection
Before moving on to the next stage of construction, the rough framing and associated systems must be inspected by local building inspectors to ensure everything meets safety and code requirements. The inspector will check the framing for proper spacing, alignment, and the strength of the structure. They will also examine the plumbing, electrical, and HVAC systems for compliance. If any issues are found during the inspection, the necessary corrections must be made before proceeding. Once the inspection passes, the building is ready for the next phase of construction, such as installing insulation, windows, and doors.
10. Finalizing the Rough Framing
The final steps in the rough framing process include cleaning up the site, removing any temporary bracing, and ensuring that all framing components are securely attached. The house should be properly sealed and ready for the installation of windows, doors, and exterior finishes. This marks the transition from the framing phase to the next steps in construction, where the house will begin to take its final shape.
Conclusion
Rough framing a house is an essential and complex process that involves careful planning, precision, and a step-by-step approach to constructing the skeleton of the structure. From setting the foundation and building the floor frame to framing the walls, roof, and adding sheathing, each stage of rough framing requires attention to detail and coordination between various trades. Ensuring that the framing is done correctly sets the stage for a durable, safe, and functional home. Proper rough framing also provides the foundation for the installation of plumbing, electrical, and HVAC systems, which are crucial to the operation of the house. Therefore, it’s vital that every step is carried out with skill, following building codes and safety regulations to ensure that the home is built to last.