Building a cheap house in 10 days using plywood and wood is an ambitious but achievable project, depending on careful planning, a well-organized team, and a focus on efficiency. Plywood and wood, being affordable and versatile materials, provide an excellent base for a budget-friendly home, but constructing such a house requires understanding the basic principles of construction, the constraints of time, and the physical characteristics of these materials. This approach emphasizes simplicity in design, utilizing modular construction methods, and ensuring that the construction process remains streamlined and efficient to meet the 10-day deadline.
Initial Planning and Design (Day 1)
The first step in building a cheap house in such a short period is proper planning and design. It is essential to choose a design that is simple, functional, and adaptable to the materials on hand. A small, single-story house or cabin is an ideal choice, as it requires fewer materials and can be built with basic carpentry skills. The design should also include efficient use of space, like open-plan living areas, where walls can be minimized, and large windows for natural light. The construction will focus on rectangular or square shapes since they are easier to construct and reduce material waste.
The foundation design is crucial for ensuring stability while keeping costs low. A concrete slab foundation or a concrete block foundation is often the most affordable and simplest option. However, in the case of extremely tight budgets, a raised wood foundation can also be considered, especially if the ground is relatively level. A raised foundation keeps the floor structure away from moisture and pests and is often faster and cheaper to build.
During this first day, a materials list should be created, specifying the quantities and types of plywood, wood (such as lumber or dimensional timber), nails, screws, and fasteners, as well as any additional items like insulation, roofing materials, and waterproofing membranes. A detailed timeline should be created, outlining tasks for each day, and the team should be divided into smaller work groups for different tasks.
Day 2: Site Preparation and Foundation
Site preparation is a crucial step in the construction process. On Day 2, clearing the building site involves removing any vegetation, rocks, and debris that may interfere with the foundation. If the site is uneven, some grading may be necessary. Once the area is cleared, the next step is to lay out the foundation. For a concrete slab foundation, this would include digging and leveling the ground, followed by the installation of rebar or a steel reinforcement mesh for added strength.
In the case of a raised wood foundation, wooden beams will be placed on concrete piers or blocks, and the wood will be treated to resist moisture and pests. This method requires less labor and time compared to a full concrete foundation. The framing of the foundation needs to be level, square, and strong enough to support the weight of the structure. While the foundation is being prepared, a portion of the team can begin cutting plywood sheets and lumber to the required sizes for the walls, floor, and roof.
Day 3-4: Framing the Structure
With the foundation prepared, the next focus is on framing the house. Framing is the skeleton of the structure, and its design and execution are essential for creating a stable and durable home. For a cheap and quick build, the framing should be simplified, using standard lumber (2x4s or 2x6s) and plywood. The walls of the house can be framed using horizontal and vertical studs spaced 16 inches apart, a standard practice in residential construction. Using pre-measured lengths of lumber ensures that the framing can be erected quickly and minimizes material waste.
The exterior walls can be sheathed with plywood, which provides structural support and helps to seal the building against the elements. The plywood should be cut to fit the framed walls, and each sheet must be nailed or screwed securely into place. Window and door openings should be framed carefully, with headers and supports that can bear the weight of the structure above. These openings should also be framed to allow easy installation of windows and doors later on in the project.
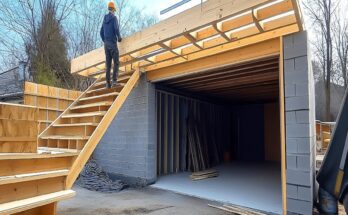
While one crew focuses on the main walls, another crew can start framing the roof. The simplest roof design for a budget build is a gable or shed roof, as these designs require minimal materials and are quick to assemble. The roof rafters, made from lumber, should be placed at regular intervals, ensuring they are level and securely anchored to the top plates of the wall framing. Plywood sheets can be used to sheathe the roof, although roofing felt or a similar material should be added before the final roofing material is installed.
Day 5-6: Installing Windows, Doors, and Roofing
Once the framing is completed, the next priority is to install windows and doors. These should be pre-purchased or built on-site from available materials like plywood or salvaged wood. Simple, single-glazed windows and basic doors are both cost-effective and functional for this type of build. For a quick installation, window and door frames can be constructed separately and then attached to the openings in the wall framing. Using shims to ensure proper alignment and level is essential to make sure the windows and doors function correctly.
At the same time, roofing materials should be installed. If using corrugated metal or asphalt shingles, the roofing material should be fastened to the plywood sheathing with appropriate nails or screws, making sure the seams overlap to prevent leaks. If using plywood for the roof, it’s crucial to waterproof the surface using roofing felt or a plastic membrane before applying the final layer of roofing material.
Day 7-8: Siding and Insulation
By now, the structure should begin to take shape, and it’s time to turn attention to the siding and insulation. For siding, plywood is often used because it’s inexpensive and can be painted or treated to enhance durability and aesthetics. The plywood sheets are nailed or screwed to the framing, starting from the bottom and working upward. Each sheet should be overlapped to ensure a waterproof exterior. If desired, siding can be further customized with trim pieces to add character.
If insulation is being added, this is typically done by inserting fiberglass batts or foam boards between the studs before applying the interior wall covering. Insulation helps regulate the temperature inside the home, reducing heating and cooling costs. Depending on budget, insulation may not be necessary, but it is a recommended step for increased comfort in extreme weather conditions.
Day 9: Interior Walls and Finishing Touches
With the exterior complete, the next step is the installation of the interior walls. In most budget builds, interior walls are kept simple, and plywood or other affordable materials like drywall are used. Plywood can be left as-is or painted to create a rustic look, which adds character to the interior. This phase will involve the installation of any partitions or non-load-bearing walls inside the house, as well as adding basic fixtures like electrical outlets, light switches, and any plumbing connections if required.
Basic finishing touches, like molding around windows and doors, should be installed, followed by caulking and sealing any gaps or cracks to ensure insulation efficiency. It’s also important to check the structural integrity of the building and address any issues before moving on to the final steps.
Day 10: Final Steps, Clean-Up, and Inspection
The final day involves the finishing details: painting, installing flooring, and adding any remaining hardware like door handles, locks, or cabinet fixtures. If the budget allows, a simple laminate or plywood floor can be installed. If not, the unfinished plywood can be treated with a protective layer to prevent moisture damage.
The last few hours should focus on cleaning up the site, removing excess materials, and ensuring that all tools and equipment are returned. A final inspection of the entire house should be conducted to ensure that the structure is safe and ready for occupancy. This includes checking that windows and doors open and close smoothly, the roof is secure, and no gaps are left in the walls or roofing.
Conclusion
Building a cheap house with plywood and wood in just 10 days is a challenging but feasible task when the process is carefully planned and executed. By selecting a simple design, utilizing cost-effective materials, and maintaining a well-organized construction team, it’s possible to create a functional and stable home in a remarkably short period. While the house may be basic, it can provide a solid foundation for future improvements or serve as a temporary living space. The key to success lies in the efficient use of time, resources, and labor to complete each phase of construction systematically.