Building a simple wooden house in just ten days is a challenging yet achievable feat with careful planning, a dedicated team, and efficient use of resources. The first step in this process is to thoroughly plan the project in advance, ensuring that every detail is covered, from the foundation to the final touches. A typical simple wooden house consists of a basic structure, which usually includes a small living area, kitchen, and one or two bedrooms, making it feasible to construct in such a short time frame.
Day one of the build begins with preparing the site and laying the foundation. The area must be leveled, cleared of debris, and ready for construction. For a simple house, a concrete slab foundation or post-and-beam construction could be chosen, depending on the site’s soil and the budget. Concrete piers may be placed in the ground at key intervals to support the structure, or a simple concrete slab may be poured to create a level surface. This phase typically involves the use of machinery, such as a backhoe or a mini-excavator, to dig the holes and trenches for the piers or slab. Laborers also measure and lay out the foundation lines to ensure the structure’s accuracy in size and shape.
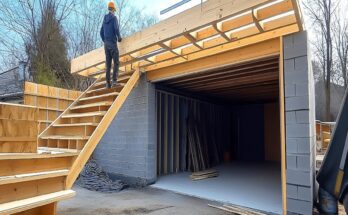
By the second day, the frame construction begins. To ensure efficiency, pre-cut lumber should be on hand and organized according to its specific use. The framework involves assembling the floor joists, followed by the walls, and then the roof trusses. The framing team works swiftly, with each worker assigned a specific task—some will be responsible for attaching the floor joists, while others will handle the wall framing. Standard dimensional lumber such as 2x4s or 2x6s is commonly used for the framework, and they are secured using nails or screws. If prefabricated trusses are available, these can be easily lifted into place with minimal effort, speeding up the construction process. Each wall is typically framed on the ground, then lifted into place and secured to the foundation.
Day three marks the continuation of framing with more focus on securing and bracing the walls. Once the main structure is complete, a team of workers can start installing the roof rafters. A simple gable roof design is often the easiest and fastest to construct. The rafters are placed at regular intervals and secured to the top plate of the walls. To ensure the roof’s stability, temporary bracing is necessary until the roof decking and shingles are applied. On this day, a roofer or carpenters may also begin laying plywood or OSB (Oriented Strand Board) on the roof, creating the base layer for the shingles or other roofing material.
Days four and five are typically dedicated to exterior sheathing and the installation of windows and doors. Exterior sheathing is applied to the framed walls to add structural stability and weatherproofing. Plywood or OSB is nailed or screwed to the exterior side of the framed walls, covering the studs. This sheathing will provide the necessary surface for attaching the exterior siding or cladding. While the sheathing is being applied, a team can also begin installing windows and doors. These should be pre-measured and pre-built to fit the framed openings, reducing the amount of time spent during installation. Depending on the house design, a simple wooden siding like board-and-batten or lap siding can be used, or more advanced options like fiber cement board might be chosen for durability and ease of installation.
By day six, the roof is well underway. The roofing team focuses on covering the plywood sheathing with roofing felt or tar paper. Once this layer is secure, shingles or another roofing material, such as metal panels, can be laid down. For a simple wooden house, asphalt shingles are often the most economical and straightforward option. Installing the shingles involves overlapping each row to ensure proper waterproofing. Depending on the weather conditions, the roofing team can often complete the installation by the end of the day.
Days seven and eight are spent working on the exterior finish and beginning interior work. Siding is typically installed during these days, and any remaining exterior details like trim work around the windows and doors are completed. This can be done quickly if the siding materials have been pre-cut and pre-painted. Additionally, these days can be spent installing the porch or deck if the house design includes such features. Meanwhile, the interior team can start laying the subfloor, followed by installing the interior walls and ceiling framing. Wiring and plumbing should also begin at this stage, but to keep the process efficient, some homes might go without intricate plumbing or electrical work initially, focusing only on essential systems like lighting.
Day nine marks the final touches for the exterior, including painting and weatherproofing. It is crucial to apply a coat of paint or sealant to protect the wood from moisture and insects, as wood is susceptible to damage if left untreated. While exterior painting is taking place, interior workers can focus on finishing the walls, adding insulation if needed, and installing basic interior features such as drywall, flooring, and cabinetry. For a simple house, drywall may not be necessary in all areas, and the exposed wooden beams can remain visible in some places, contributing to the rustic aesthetic. Flooring choices, such as vinyl or laminate, can be installed quickly, providing a clean, easy-to-maintain surface for the home.
On the tenth day, the final tasks are completed. The house’s plumbing, if necessary, can be installed at this point, along with any electrical outlets and switches. After these systems are in place, the remaining doors and windows can be hung, and final interior trim and hardware can be installed. A cleaning crew should be employed to remove construction debris, and the house can be given its final inspection. This is a good time to ensure that everything is properly sealed, such as windows and doors, to prevent drafts and moisture penetration.
Throughout the ten days, careful coordination is crucial. A project manager or contractor should oversee the entire process, ensuring that tasks are completed on time and that the workforce stays organized. Efficiency is key, and for that, it’s important that the construction team is well-trained, experienced, and able to work in tandem. Pre-ordering materials and having a clear timeline helps avoid delays, and having extra workers on hand can allow different parts of the house to be worked on simultaneously. Moreover, technology can aid in speeding up the build—using power tools like saws, drills, and nail guns reduces manual labor and increases the pace at which tasks are completed.
While a simple wooden house can be completed in ten days, the final product may be a modest, no-frills home, offering basic shelter and comfort. However, it would be well-constructed, functional, and capable of standing the test of time if built properly. This speedy timeline would be particularly advantageous in emergency situations or for temporary housing, where rapid construction is necessary. The key to success lies in efficiency, pre-planning, and teamwork, ensuring that each day is used to its fullest potential in the pursuit of a safe and sturdy home.