My name’s Andrew, and two summers ago, I set out to build a custom shed. I started by modeling everything in SketchUp, ordered the materials, and got to work. I had some leftover pressure-treated 4x4s from another project, so I decided to build a wooden shed base. In hindsight, I wish I had just framed the walls directly on the concrete slab. I used a few Tapcon screws to secure the base and laid pressure-treated plywood as the decking. I marked 16-inch on-center stud spacing on my top and bottom plates and secured the studs using a framing nailer. Since I wanted a window on each side, I framed out the king studs and jack studs to fit the window sizes.
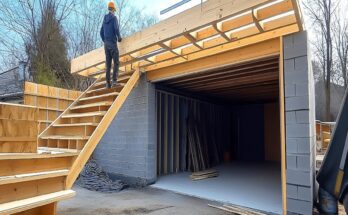
The front wall was a bit more complicated, so I laid everything out on the base and needed to rip down a piece of plywood for the header thickness. Once everything was secured based on my free framing plan (link below), I lifted the walls into place. It’s really helpful to have a second person to hold the walls; otherwise, you’ll need to install a brace temporarily. I secured the corners with structural screws and used double top plates to lock everything together. After cutting out the door opening with a saw, I moved on to the lean-to roof rafters. My rafter spacing was conservative, and I cut bird’s mouths at the top and bottom using a framing square and circular saw. After testing the fit on the front and back of the shed, I used one rafter as a template for the others.
I marked the rafter spacing, lifted them into place, toenailing them into the top plates, and used hurricane ties for extra security. I also toenailed blocking between the rafters and positioned the fascia boards, using a jig for support. With a 12-inch overhang, I secured the fascia in place, relying on bar clamps to help with the overhead work. For the roof decking, I used half-inch plywood, positioned it so each sheet’s edge landed in the center of a rafter, cut everything to size, and marked rafter locations to nail it down.
At the base of the shed, I installed a ledger board and painted the T1-11 LP Smart Siding, resting it on the ledger. I ensured each 4×8 sheet interlocked properly, cut out window penetrations, and secured the siding to the studs every 12 inches. I caulked and painted the nail heads later. For the front, I positioned half-inch plywood, marked penetrations, and cut them out with a circular saw and jigsaw for the corners. After confirming the fit, I secured the plywood and moved to the jack studs on the sides, installing the mounting board.
Next, I cut the plywood to size for the shed’s sides and secured it, adding plywood underneath for support. I pre-painted PVC trim boards black and secured them at the corners, making sure they were flush. I used screws to attach them but realized I should have used exterior-rated brad nails. I left a slight overhang on the windows to catch the acrylic panels, saving some money. After installing the remaining PVC trim, I waterproofed and installed the windows, securing them and adding trim around the perimeter. After some touch-up paint, I moved on to the roll-up door. It was quite expensive, but I thought it was worth it for the cool look.
We positioned the door, secured the frame, and tested it out. For the roof, we installed the drip edge, rolled out tar paper secured with staples, and trimmed the excess. Then, we put on the starter row and used a chalk line to ensure straight shingle rows, securing each with about four nails. At the top, I installed ridge flashing, nailing it in and sealing the nail heads with roofing mastic. Once that was done, I built a ramp with leftover composite decking and ran electricity from my house to the shed.