# Building a Workshop from Scratch: A Step-by-Step Guide
Creating a workshop from scratch is a rewarding endeavor that combines planning, creativity, and hands-on effort. Whether you’re a woodworker, mechanic, or DIY enthusiast, a well-designed workshop can become your sanctuary for productivity and innovation. Here’s a guide to help you build a functional and inspiring space tailored to your needs.
#### Step 1: Define Your Purpose and Space
Before breaking ground, clarify what you’ll use the workshop for. Will it be for woodworking, metal fabrication, or a mix of crafts? The purpose dictates the size, tools, and layout. Next, choose a location. A garage, backyard shed, or basement can work, depending on your property. Aim for at least 200-300 square feet if space allows—enough room for tools, materials, and movement. Check local zoning laws or permits if you’re constructing a new structure.
#### Step 2: Plan the Layout
Efficiency is key. Sketch a floor plan that includes zones for workbenches, storage, and machinery. Place heavy equipment like table saws or lathes near power outlets and away from walkways to minimize clutter. Consider workflow: raw materials should flow from storage to workstations to assembly areas seamlessly. Leave space for future upgrades—your needs may evolve. Factor in lighting, too; natural light is ideal, but bright LED fixtures are a must for precision tasks.
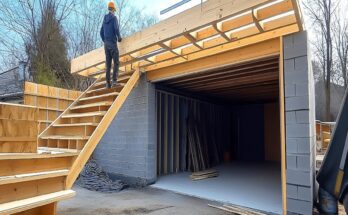
#### Step 3: Build the Structure
If you’re starting with a bare site, frame the workshop with a simple wood or metal skeleton. A concrete slab foundation offers durability, though a raised wooden floor works for lighter setups. Insulate walls if you live in a climate with extreme temperatures—comfort matters during long projects. Install sturdy roofing, like metal or shingles, to protect against weather. Add windows or skylights for ventilation and light, and ensure the entrance accommodates large materials.
#### Step 4: Power and Utilities
A workshop thrives on reliable electricity. Install ample outlets (110V and 220V for heavy tools) and a breaker panel sized for your equipment. If you’re welding or using compressors, plan for ventilation—exhaust fans or ductwork keep air clean. Running water is optional but handy for cleanup or certain crafts. Test all systems before heavy use to avoid surprises.
#### Step 5: Equip and Organize
Start with essential tools: a workbench, power tools (drill, saw, sander), and hand tools (hammers, wrenches). Invest in quality over quantity—cheap tools frustrate more than they help. Storage is your friend: pegboards, shelves, and cabinets keep gear accessible yet tidy. Label drawers for small items like screws or bits. A rolling cart adds flexibility for in-progress projects.
#### Step 6: Personalize and Safety-Proof
Make the space yours. Paint walls a bright color to boost energy, or add posters of your favorite builds. Install a sound system for music—nothing beats a good playlist while you work. Safety comes first, though: mount a fire extinguisher, keep a first-aid kit handy, and use dust collection systems or masks for air quality. Ground all electricals to prevent shocks.
#### Final Thoughts
Building a workshop from scratch takes time, but the payoff is a custom space where creativity flows. Start small, adapt as you go, and enjoy the process. Soon, you’ll have a haven ready for your next big project.